Before you read on, stop and play for a second. What you’re seeing here is the emulator written in Go running inside of WASM inside your browser, everything here is local!
Controls: Z=A, X=B, A=L, S=R, Enter=Start, Backspace=Select
Why?
I chose a GBA emulator because I wanted to understand computers at a lower level than just running a program. As a software engineer, you spend most of your time at the top of a very tall stack of abstractions. You write code, it compiles, and it runs. But I wanted to know what happens in the middle. I wanted to see how a binary actually runs, what all the components are, and how they talk to each other.
The GBA felt like the right target for this. It is a console I played with as a child, so I was already familiar with how the games should look and feel. It is also simple enough to build compared to modern consoles, though as I found out, simple is a relative term. The GBA is just complex enough that you cannot just “guess” how it works, you have to have a good understanding of the inner workings.
I chose Go because it is the language I am most fluent in. Most people would choose C, C++, or Rust for a project like this because they are the industry standards for performance and low-level control. I thought it would be interesting to see how a language not normally considered for emulators would handle the task. I wanted to see if Go could handle the strict timing requirements and the constant memory access without the overhead becoming an issue.
Getting Started
Building an emulator is a long process of working through documentation. For the GBA, the primary source of truth is a document called GBATEK. It is essentially the bible for GBA development, detailing every register, every memory address, and every instruction the hardware supports.
The first major milestone was getting to a point where I could see a single red dot in the corner of the screen. To test this, I used TinyGo to write an actual GBA game that did nothing but display that one pixel. This might sound trivial, but it was a huge hurdle. For that pixel to show up, the CPU had to be able to fetch instructions from the game, decode them, and execute them correctly. The memory map had to be set up so that writing to a specific address actually changed a pixel on the screen.
Seeing that red dot was the first real sign of life. It meant the brain of the system, the CPU, and the memory were finally working together. It was the foundation for everything else. After that, it was a slow process of adding more instructions and more hardware support until I reached the point where I could actually load an official GBA game.
Building the Picture
One of the most interesting parts of the project was building the LCD, or the display logic. Unlike a modern computer that just has a big buffer of pixels, the GBA builds its screen in layers. It has different modes for different types of games.
Some modes use tiles, which are 8x8 squares of pixels that the GBA tiles across the screen to create backgrounds. This was a way to save memory back when every kilobyte mattered. Other modes allow for bitmaps, where you can draw directly to the screen, which is how more complex graphics or 3D effects were often achieved.
Implementing this meant I had to build a rendering engine that could handle these different modes simultaneously. For example, a game might have a tiled background for the world, but use objects (sprites) for the characters. The GBA has to calculate which pixels are visible, which ones are transparent, and which ones are on top of others, all within a very tight window of time.
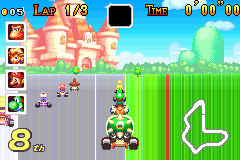
This is also where some of the current bugs live. For example, cave fog in Pokémon isn’t transparent like it should be because the blending logic between layers isn’t quite right yet. In Mario Kart, the players sometimes flash on and off because the way the GBA handles sprite priority is very specific and easy to get wrong.
Technical Challenges
The CPU and its Two Languages
The GBA uses an ARM7TDMI processor. The interesting thing about this CPU is that it speaks two languages: ARM and THUMB. ARM instructions are 32 bits long and very powerful, while THUMB instructions are only 16 bits long and designed to save space.
The CPU can switch between these two modes on the fly. This meant I had to implement two entire sets of instruction logic and ensure the transition between them was seamless. If a single instruction is off by even one bit, the whole game will eventually crash or behave in bizarre ways.
The Memory Battle
The hardest part was definitely the memory. The GBA has a very specific way it handles its memory. It has different regions for different things, like internal work RAM, external work RAM, and the game cartridge itself.
Each of these regions has different wait states, meaning it takes the CPU longer to read from some areas than others. Getting the emulator to respect all these tiny hardware quirks was a constant battle. If the timing is wrong, the game might run too fast, too slow, or just fail to load entirely. There is also the issue of alignment. If you try to read a 32-bit value from an address that isn’t a multiple of four, the GBA does something very specific and strange. If you don’t emulate that exact strange behavior, some games will never work.
Running in the Browser
Porting the emulator to run in the browser using WASM was actually very easy. Because of how I originally built the emulator to handle graphics, mapping it to a web page took less than an afternoon. I designed the engine to output to a standard image format in Go, which made it easy to draw that image onto a JavaScript canvas.
The main issue I found with the web version is performance. On a desktop, the emulator is fast enough to run the game at 10x its original speed. But in the browser, everything has to run on a single thread. If the computer cannot keep up with the 16.78 MHz requirement of the GBA, the browser tends to freeze as it tries to catch up. To fix this, I have forced the browser version to run at exactly 1x speed. It is still a work in progress to make it smoother for mobile devices where processor power is more limited.
Hunting the Invisible Bugs
Debugging an emulator is a unique kind of pain. In a normal Go program, you can just step through the code with a debugger and see exactly where things go wrong. But with an emulator, the code you are debugging isn’t the Go code, it is the GBA game itself. There are no off-the-shelf debuggers that support a custom emulator, so if you don’t build one from scratch, you are on your own.
The hardest part wasn’t necessarily fixing visual glitches like scrambled sprites or flickering backgrounds. It was trying to trace back from a bad state to the original instruction that caused it. If a game crashes or shows a black screen, it is usually because a register or a piece of memory ended up with the wrong value ten thousand instructions ago.
Without a dedicated debugger, I had to rely on manual breakpoints in my Go code and then manually decode the GBA instructions to understand how the system reached that state. I would have to look at a raw binary dump of memory, figure out which instruction was being executed, and then manually calculate what the registers should look like. It was a tedious process of comparing my internal state against the documentation over and over again until the error became clear. Finding a single bit that was flipped incorrectly in an instruction implementation could take hours of manual tracing. Unlike a modern application where you get a stack trace, here you just have a silent failure and a lot of binary values to sort through.
“Aha!” Moments
There were two moments that really kept me going when I was frustrated.
The first was the “First Cycle.” This was when I finally finished the full list of instructions for the CPU. For a long time, the emulator would just panic and crash because it hit an instruction I hadn’t written yet. Seeing the program finally cycle through thousands of instructions and do something without crashing was the first time I felt like I might actually finish this project.
The second was the “First Pokémon Screen.” Even though that first screen was corrupted and buggy, seeing a game I played as a kid actually rendering on code I wrote from scratch was a huge motivation boost. It turned the project from a theoretical exercise in CPU design into a real, tangible thing that I could interact with.
What’s Next?
Sapphire is functional, but there is still a lot to do. Sound is the next big feature on the list. The GBA has a mix of legacy Game Boy sound channels and newer digital sound channels, and getting them all synced up with the CPU is going to be another big challenge.
I also need to fix the “Internal battery has run dry” message that pops up in Pokémon Sapphire. This happens because I haven’t implemented the hardware for the internal clock yet. For now, you can at least use save states. They work fine on both the desktop and browser versions, saving your progress to either a file or your browser’s local storage.
It has been a long road of working on and off, but finally being able to play through a game on my own engine makes all the hours of staring at documentation worth it.
You can find the source code for Sapphire on GitHub.